

Overview › Build it in Google Sheets › Lesson 1
Set up your data
The most important step in a single-case graph happens before you make the chart. If you put each phase in its own column, Google Sheets breaks the data path at every phase change for you.
The most important step in a single-case graph happens before you make the chart. If you put each condition in its own column, Google Sheets gives each condition its own data path, which is what lets a reader compare them.
You will be able to
- Set up a sheet with session numbers in column A and one column per phasecondition, leaving the other cells empty, not 0.
- Explain why separate columns break the data path at each phase changegive each condition its own data path.
- Turn data kept in one long column into phasecondition columns with an
IFandNA()formula.
What you will build in this series
Across Lessons 1 to 4 you will turn a small table of numbers into this reversal (ABAB) design graph: the first tier, Participant 1, of a three-tier figure. Lessons 5 and 6 cover multiple baseline, alternating treatments, multielement, and changing criterion graphs, so you can skip them for this graph. Lesson 5 copies this tier for Participants 2 and 3 and stacks the three tiers into one figure in Google Slides. Along the way you will connect each treatment's points across blank cells, give each condition its own point shape, and name the two treatments with labels beside their paths. Lesson 6 recaps these settings for when you graph your own data. Along the way you will connect each condition's points across blank cells, give each condition its own point shape, and add a legend. A multielement graph has no phase-change lines. Lesson 6 recaps these settings for when you graph your own data. Along the way you will add a dashed criterion line for each subphase and label each subphase with its criterion. Lesson 6 recaps these settings for when you graph your own data.
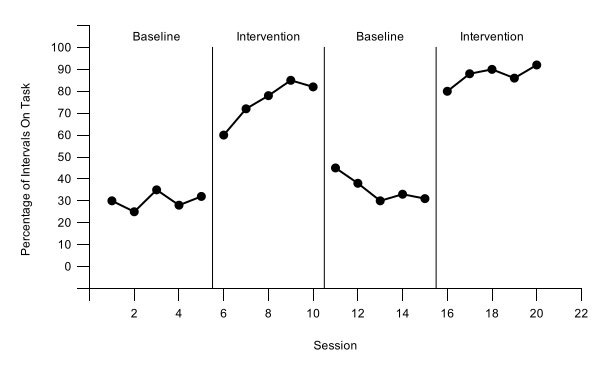
Want to follow along with the same numbers? Download practice-reversal-data.xlsx. It has the data already typed and nothing else. The tip after the steps shows how to bring it into Google Sheets. It holds all three participants. Lessons 1 to 4 use only Participant 1, in columns A:C.
The layout: one column per phasecondition
Put session numbers in column A. Give each phase its own column. Then type each session's value only in the column for the phase it belongs to, and leave the other cells in that row empty.
Put session numbers in column A. Give each condition its own column. Then type each session's value only in the column for the condition run in that session, and leave the other cells in that row empty.
| A | B | C | D | E | |
|---|---|---|---|---|---|
| 1 | Session | Baseline 1 | Intervention 1 | Baseline 2 | Intervention 2 |
| 2 | 1 | 30 | |||
| 3 | 2 | 25 | |||
| 4 | 3 | 35 | |||
| 5 | 4 | 28 | |||
| 6 | 5 | 32 | |||
| 7 | 6 | 60 | |||
| 8 | 7 | 72 | |||
| 9 | 8 | 78 | |||
| 10 | 9 | 85 | |||
| 11 | 10 | 82 | |||
| 12 | 11 | 45 | |||
| 13 | 12 | 38 | |||
| 14 | 13 | 30 | |||
| 15 | 14 | 33 | |||
| 16 | 15 | 31 | |||
| 17 | 16 | 80 | |||
| 18 | 17 | 88 | |||
| 19 | 18 | 90 | |||
| 20 | 19 | 86 | |||
| 21 | 20 | 92 |
Why separate columns? A Google Sheets line chart draws one line for each column (each series), and an empty cell breaks the line. With four phase columns you get four separate data paths. That is exactly the break that single-case conventions require at each phase change. If all the values were in one column, the chart would join the last baseline point to the first intervention point. That suggests continuity between conditions that didn't happen.
In a multiple baseline design every tier follows the same rule, with its own Baseline and Intervention columns. Lessons 1 to 4 use only Participant 1's columns, A:C. In the practice file, columns D:G hold Participants 2 and 3; Lesson 5 uses them to build the other tiers.
Why separate columns? A Google Sheets line chart draws one line for each column (each series), so each condition gets its own data path and, later, its own point shape. That is what lets a reader compare the conditions session by session. Because the treatmentsconditions take turns, each treatment'scondition's column has blank cells between its values, and an empty cell breaks the line. In Lesson 3 you tell Sheets to join each condition's points across those blanks, so every condition reads as one continuous path. If all the values were in one column, the chart would draw a single zigzag line through every condition, and no reader could tell them apart.
The Baseline column has no values after session 4, so its path still ends at the phase change.
A multielement graph has no phase changes, so there are no breaks to make. The columns only keep the conditions apart.
Steps
- Open a blank spreadsheet. In your web browser, go to sheets.new, or open Google Drive and choose New›Google Sheets. Sign in with your Google account if asked. Give the spreadsheet a name by clicking its title at the top left. There is no Save step: Google Sheets saves your work to your Drive as you go.
- Type the column headings in row 1. In A1 type Session. In B1 to E1 type one heading per phasecondition: Baseline 1, Intervention 1, Baseline 2, and Intervention 2. Number repeated phases so each heading is unique. If a phase repeats in your own study, number the repeats (Baseline 1, Baseline 2) so each heading is unique. Number the criterion subphases so each heading is unique. Each condition keeps one column for the whole study, however many times it is run. The chart uses these headings as its series names. You will type the labels shown on the graph separately in Lesson 4. The chart uses these headings as its series names. You will type the words shown on the graph separately in Lesson 4. The chart uses these headings as its series names, and the legend you add in Lesson 4 lists them exactly as typed. Spell each condition the way you want it to appear on the graph. The P1 marks Participant 1; Participants 2 and 3 use P2 and P3 in columns D to G.
- Number the sessions in column A. Type 1 in A2 and 2 in A3. Select both cells, then drag the small square at the bottom-right corner of the selection (the fill handle) down until the last session number appears: 20 in A21.
- Type each value in its phase'scondition's column. Sessions 1 to 5 go in column B, sessions 6 to 10 in column C, and so on. Sessions 1 to 5 go in column B and sessions 6 to 15 in column C. Sessions 1 to 5 go in column B and sessions 6 to 18 in column C. Sessions 1 to 5 go in column B, sessions 6 to 8 in column C, sessions 9 to 13 in column D, and so on. Each criterion subphase gets the next column. Sessions 1 to 4 (baseline) go in column B. After that, each session's value goes in the column of the treatment run that session: session 5 in column C (Treatment A), sessions 6 and 7 in column D (Treatment B), sessions 8 and 9 back in column C, and so on. Each session's value goes in the column of the condition run that session: session 1 in column B (Play), session 2 in column C (Attention), session 3 in column D (Demand), and so on. Each row should have a value in exactly one phasecondition column, B or C.
- Leave the other cells truly empty. Don't type 0, a space, a dash, or NA in cells that belong to other phasesconditions. The chart would plot a 0, or read the column as text. If you typed something by mistake, select the cell and press Delete. A real zero is different: if you measured the behavior in a session and it was zero, type 0 in that session's own column so the point is plotted. In the practice data, Play is 0 in sessions 1, 13, and 18.
- Keep the session numbers plain numbers. Google Sheets lines numbers up at the right edge of a cell and text at the left. If a session number sits at the left of its cell, it is stored as text, and the chart can't place it on a number line. Select the cell, type the number again, and press Enter.
Using the practice file? Bring it in instead of typing. In your new spreadsheet, choose File›Import, choose Upload, and select practice-reversal-data.xlsx from your downloads. In the Import file box, set Import location to Replace spreadsheet and click Import data. The data start in cell A1. You can also open the file in Excel, select A1:E21, copy it, click cell A1 in Google Sheets, and paste with Ctrl+V (⌘+V on a Mac). Pasted blank cells stay blank. Either way, check the result against steps 2 to 6.
If your data are already in one long column
Data sheets often have three columns: Session, PhaseCondition, and Value. You don't have to retype anything. Leave that sheet as it is, and build the phasecondition columns on a new sheet in the same spreadsheet, with a formula that copies each value only when its phasecondition matches the column's heading.
- Add a sheet for the graph. Click the + button at the bottom left of the window. A new, empty sheet opens. Lessons 2 to 7 use this new sheet.
- Type the headings. In the new sheet, type Session in A1 and one heading per phasecondition from B1 on. Each heading must match the name in your PhaseCondition column exactly.
- Copy the session numbers.
The examples below assume your long data sit on a sheet named Data, with Session in column A, the phasecondition name in column B, and the value in column C. Use your own sheet's name, as its tab at the bottom of the window shows it; if the name has spaces, put it in single quotes, such as
'Raw data'!A2. In A2 type=Data!A2. - Add the formula and fill it.
In B2 type:
=IF(Data!$B2=B$1, Data!$C2, NA())It copies the value when that row's phasecondition matches the heading in row 1 of its column, and puts#N/Aeverywhere else. Copy B2, select the rest of the table (from B2 across to your last heading's column and down to your last session's row), and paste. Then copy A2 and paste it down column A to the same row. Because the formula reads the heading, you don't have to edit it for each column.
Use NA(), not "". The chart treats a #N/A cell as a missing value, just like an empty cell. The #N/A cells look untidy in the sheet, but they never show on the graph. The formulas also keep working: if you correct a value on the data sheet, the graph sheet and the chart follow.
The heading must match what your Phase column says. Many data sheets repeat the same names: Baseline, Intervention, Baseline, Intervention. Then the formula can't tell the first baseline from the second: a heading of Baseline 1 matches nothing and fills its column with #N/A, and a heading of Baseline puts both baselines in one column. Number the runs in your Phase column itself (Baseline 1, Intervention 1, Baseline 2, Intervention 2), so each name matches one heading.
The heading must match what your Phase column says, so each subphase needs its own name there. If your data sheet uses one name for more than one subphase, such as Intervention for every criterion level, rename the subphases in your Phase column first (Phase 1, Phase 2, and so on), so each name matches one heading.
Check before moving on
- Column A holds session numbers that run 1, 2, 3 … 20 without gaps or text
- Each phasecondition has its own column, with a unique heading in row 1 (B1:E1)
- Each row has a value in exactly one phasecondition column, B or C
- Cells for other phasesconditions are empty (or
#N/A, if you used the formula), not 0 - Each treatment'scondition's column has blank cells between its values. That is expected; Lesson 3 connects the points
- For Lessons 2 to 4 you use only columns A:C, Participant 1's data
- The rows under your data are still empty: Lesson 4 types helper rows there